
If you’re looking for a quick and convenient way to make nutritious bone broth, look no further than the Instant Pot. This versatile kitchen appliance can help you make a flavorful and nutrient-rich bone broth in a fraction of the time it takes to make it on the stovetop. Whether you’re a seasoned cook or a beginner in the kitchen, using the Instant Pot to make bone broth is easy and foolproof.
One of the best things about making bone broth in the Instant Pot is that it requires minimal hands-on time. Simply toss in your bones, vegetables, herbs, and water, set the Instant Pot to high pressure, and let it do its thing. In just a few hours, you’ll have a delicious broth that is packed with collagen, amino acids, minerals, and other nutrients. Plus, the Instant Pot’s pressure cooking function helps to extract all the goodness from the bones, resulting in a rich and gelatinous broth.
- Step 1: Start by selecting the right bones for your broth. You can use chicken, beef, pork, or even fish bones.
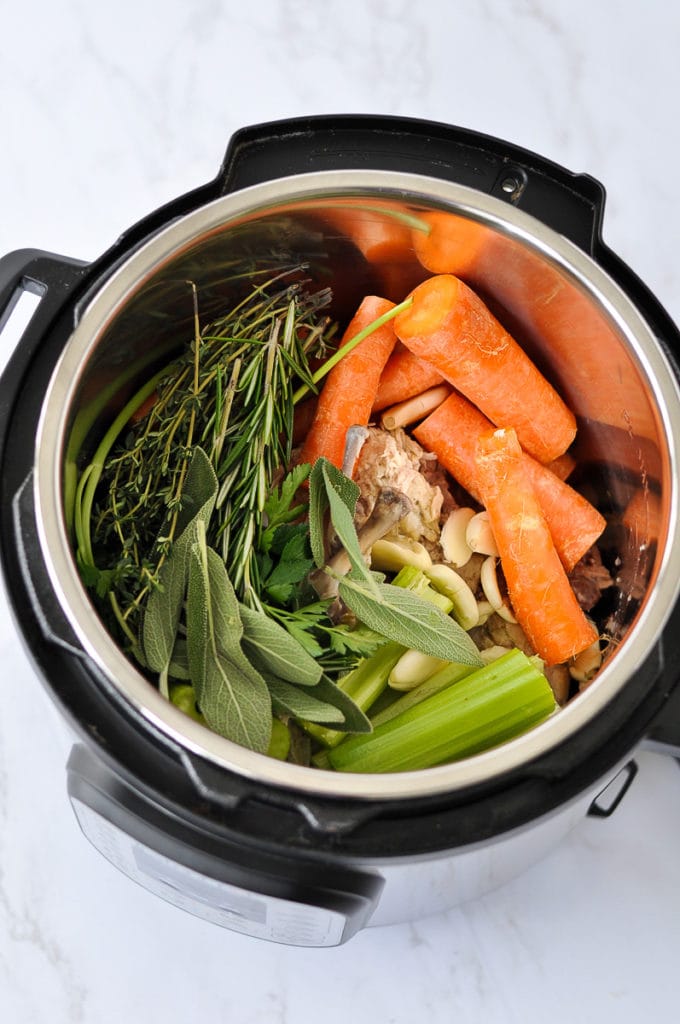
- Step 2: Place the bones in the Instant Pot, along with any vegetables and herbs you want to add for flavor.
- Step 3: Fill the Instant Pot with enough water to cover the bones, but be careful not to exceed the maximum fill line.
- Step 4: Close the lid and set the Instant Pot to high pressure. Cook for 1-2 hours for chicken bones, or 2-3 hours for beef or pork bones.
- Step 5: Once the cooking time is up, allow the Instant Pot to naturally release the pressure for about 15 minutes. Then, carefully open the valve to release any remaining pressure.
- Step 6: Strain the broth through a fine-mesh sieve or cheesecloth to remove any solids. Store the broth in jars or containers in the refrigerator or freezer.
With the Instant Pot, making bone broth has never been easier. Whether you’re sipping it on its own, using it as a base for soups and stews, or using it to add flavor and nutrition to your favorite recipes, homemade bone broth is a versatile and nutritious addition to any diet.
Choosing the Right Ingredients
- Bones: The main component of bone broth, the bones you choose will greatly impact the final flavor. Opt for bones with a good amount of meat still attached, such as beef marrow bones or chicken carcasses.
- Vegetables: Adding vegetables like onions, carrots, and celery will enhance the flavor of the broth. These vegetables also add nutrients and depth to the broth.
- Herbs and spices: Adding herbs and spices can take your bone broth to the next level. Consider using bay leaves, thyme, rosemary, and peppercorns to add complexity and aroma.
- Apple cider vinegar: Adding a splash of apple cider vinegar to the pot helps to extract more nutrients from the bones and enhances the overall flavor of the broth.
- Filtered water: For the best tasting broth, use filtered water instead of tap water. This will help to ensure that any impurities or chlorine in the water do not affect the taste of the final broth.
By carefully selecting high-quality bones, fresh vegetables, aromatic herbs and spices, and using filtered water, you can create a delicious and nutritious bone broth in your Instant Pot. Experiment with different combinations of ingredients to find the flavor profile that suits your preferences best.
Cooking Bone Broth in an Instant Pot

When cooking bone broth in an Instant Pot, there are a few key steps to keep in mind. First, select high-quality bones, such as grass-fed beef bones or organic chicken bones, as they will contribute to a more flavorful broth. Next, add the bones to the Instant Pot along with any vegetables, such as carrots, onions, and celery, that you wish to include for added flavor. It’s important to note that you should fill the Instant Pot no more than two-thirds of the way full to ensure there is enough space for the broth to expand while cooking.
To achieve a rich and flavorful bone broth, set the Instant Pot to the “Soup” or “Broth” setting and adjust the cooking time to at least two hours. The longer the broth simmers, the more concentrated the flavors will become. If desired, you can also add herbs and spices, such as bay leaves, thyme, or garlic, to enhance the taste of the broth. Once the cooking time is complete, allow the Instant Pot to naturally release the pressure for about 20 minutes before carefully opening the lid.
If you prefer a clear broth, you can strain the liquid through a fine-mesh strainer or cheesecloth to remove any impurities or bone fragments. Alternatively, if you prefer a thicker broth, you can refrigerate the bone broth overnight, which will cause the fat to solidify on the surface. Skim off the fat before reheating and serving the broth. Bone broth can be enjoyed on its own as a comforting and nourishing beverage, used as the base for soups and stews, or even used to cook grains and legumes for added flavor and nutritional benefits.
Tips for Cooking Bone Broth in an Instant Pot:
- Use high-quality bones for a flavorful broth.
- Fill the Instant Pot no more than two-thirds full.
- Set the Instant Pot to the “Soup” or “Broth” setting and adjust the cooking time to at least two hours.
- Add vegetables, herbs, and spices for added flavor.
- Allow the Instant Pot to naturally release pressure before opening the lid.
- Strain the broth for a clear consistency or refrigerate to skim off the fat for a thicker broth.
Straining and Storing Bone Broth
Straining the Bone Broth
Once the bone broth is done cooking in the Instant Pot, it is important to strain it to remove any solids and impurities that may be present. This will result in a clear and smooth broth. To strain the broth, you can use a fine mesh strainer or a cheesecloth. Place the strainer or cheesecloth over a large bowl or pot and slowly pour the broth through it. The strainer or cheesecloth will catch any bones, meat, herbs, or other solids, leaving you with a pure liquid broth.
It is essential to be cautious when straining hot bone broth as it can cause burns. Handle the pot and strainer with oven mitts or let the broth cool down for a while before straining. Also, make sure to strain the broth while it is still hot or warm to prevent any bacteria growth. If you plan to store the broth for a longer period or can it, cool it quickly by placing the bowl with strained broth into an ice bath or the refrigerator.
Storing the Bone Broth
Properly storing bone broth is crucial to maintain its freshness and quality. There are several options for storing bone broth:
- Refrigerator: If you plan to use the bone broth within a week, you can store it in the refrigerator. Allow the broth to cool down completely before transferring it to airtight containers or jars. Label them with the date, and store them in the refrigerator. The broth can be kept for up to 5-7 days in the refrigerator.
- Freezer: For longer-term storage, you can freeze the bone broth. Allow the broth to cool down completely and transfer it to freezer-safe containers or freezer bags. Label them and store them in the freezer. The bone broth can be stored in the freezer for up to 3-4 months.
- Canning: If you prefer to can the bone broth for even longer storage, you can transfer the strained broth to sterilized canning jars and process them in a pressure canner according to the canning instructions for broth. This method allows the bone broth to be shelf-stable for up to a year or more.
Remember to always use proper food safety precautions when handling and storing bone broth. Discard any broth that has an off smell or shows signs of spoilage.


